Toronto Bicycle Data Engineering
- You can find all the code for this project here: https://github.com/waleedayoub/toronto-bicycle-data
- This was a project I explored as part of the final project of the datatalks club data engineering zoomcamp
Project Description
- The goal of this project is to examine historical bike share ridership going as far back as 2016 in the city of Toronto, Ontario.
- The city of Toronto has an open data sharing mandate, and all bike share data can be found here: https://open.toronto.ca/dataset/bike-share-toronto/
- Unfortunately, the data is not consistently named or labeled across years (2014-2022, inclusively), so there is a need to perform quite a bit of processing to handle it.
- For example, in some years, data is stored in tabs in XLSX files, whereas in other years, they are CSVs broken down by quarters, or in other cases, by months, in CSV files
- Given that this analysis focuses on historical ridership, a batch processing pipeline is sufficient, and can be scheduled to run monthly or quarterly.
- It is unclear how often the data refreshes, but the following program handles edge cases and checks whether data has been updated before triggering pipelines
Architecture
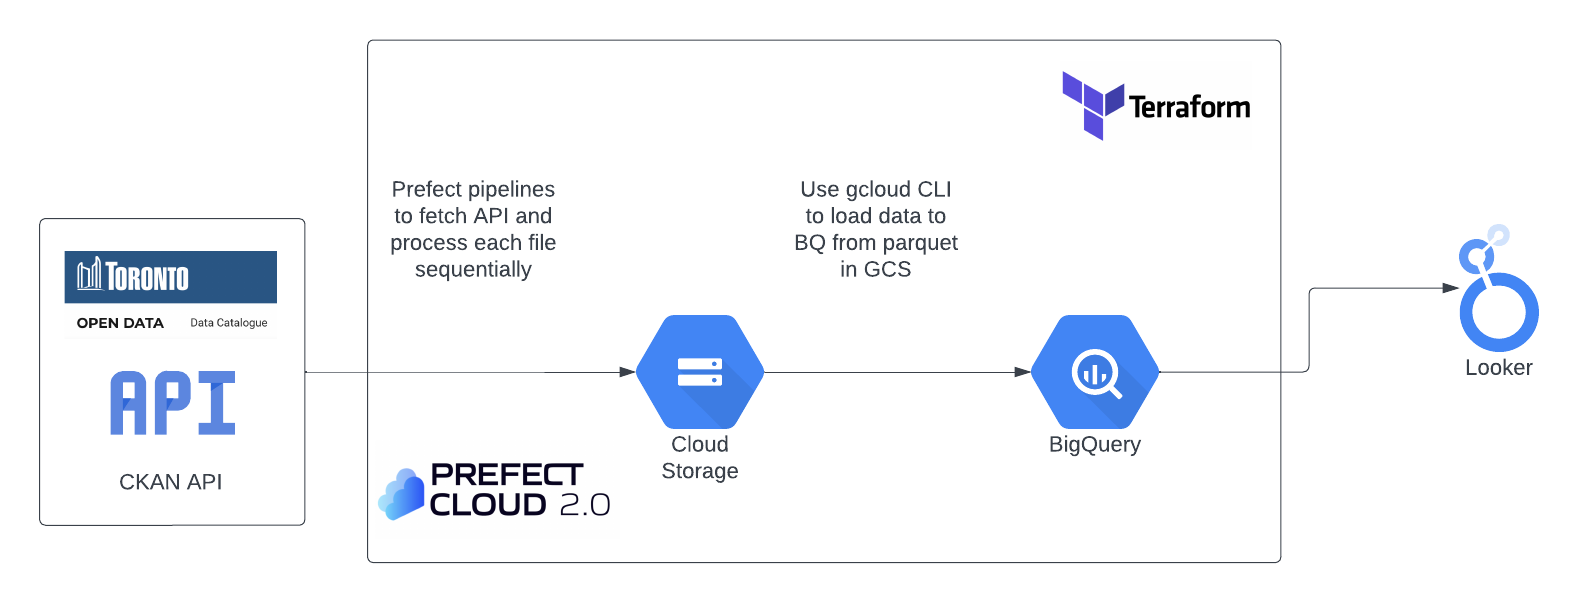
- The architecture for this project is kept fairly simple:
Data sources
Toronto
- Ridership data: https://open.toronto.ca/dataset/bike-share-toronto-ridership-data/
- For batch data, here’s an example of how to access the ridership data API:
base_url = "https://ckan0.cf.opendata.inter.prod-toronto.ca" package_url = base_url + "/api/3/action/package_show" params = {"id": "bike-share-toronto-ridership-data"} - If you do a GET request on the package_url with params provided like this:
resource = requests.get(url, params=params).json()- You can then grab the url where the data is stored like this:
resource["result"]["resources"]["url"] - And the url will be something like this: https://ckan0.cf.opendata.inter.prod-toronto.ca/dataset/7e876c24-177c-4605-9cef-e50dd74c617f/resource/85326868-508c-497e-b139-b698aaf27bbf/download/bikeshare-ridership-2014-2015.xlsx
- You can then do another GET request on that URL and write to a file in Python
- You can then grab the url where the data is stored like this:
Deployment instructions
Technologies used
- GCP / Cloud Storage / BigQuery / Looker
- Terraform
- Prefect / DBT
- Python 3.9.16 / virtualenv
Things you need to install + versions
- Google cloud SDK: https://cloud.google.com/sdk/docs/install
- Terraform 1.4.5: https://developer.hashicorp.com/terraform/tutorials/aws-get-started/install-cli
- Python: make sure you’re running 3.9.16
- Prefect 2.10.4: https://docs.prefect.io/latest/getting-started/installation/
- It is very important to get the prefect version right as GCS block’s
upload_from_dataframe()method doesn’t work in older versions
- It is very important to get the prefect version right as GCS block’s
Step 0
- Clone or copy this repo:
git clone git@github.com:waleedayoub/toronto-bicycle-data.git
Step 1 - Initial Setup + GCP
Create a service account in GCP and download the service account json (In the IAM & Admin section of the GCP console)
- Make sure the service account has the following roles assigned:
- IAM Roles for Service account:
- Go to the IAM section of IAM & Admin https://console.cloud.google.com/iam-admin/iam
- Click the Edit principal icon for your service account.
- Add these roles in addition to Viewer : Storage Admin + Storage Object Admin + BigQuery Admin
Enable these APIs for your project:
Ensure your environment variable is pointing to the .json file you downloaded from the GCP console, refresh your token session and verify the authentication. Here are the steps:
# Set your environment variable to where your .json file is located
export GOOGLE_APPLICATION_CREDENTIALS="<path/to/your/service-account-authkeys>.json"

# Refresh token/session, and verify authentication
gcloud auth application-default login
- Now you’re ready to provision the services we’ll need, using Terraform.
Step 2 - Terraform setup
- In the
variables.tffile, modify the “project” variable description with the name of your GCP project:
variable "project" {
  description = "possible-lotus-375803"
}
- Run the following:
cd terraform
terraform init
terraform apply
- You’ll prompted to select your GCP project to proceed and provision the resources
Step 3 - Install python requirements
- Run
pip install -r requirements.txt
Step 4 - Run end to end pipeline for all ridership data using Prefect
- Ensure you have an account on app.prefect.cloud
- Create 2 blocks in prefect:
- GCP credentials block with your GCP project ID and key from your service account .json file
- GCS bucket block using the name of the bucket in the terraform
dtc-toronto-bikeshareand the name of your GCP credentials block above
- In prefect cloud, grab an API key
- Run
prefect cloud login- You can follow instructions or just copy in the API key from step 3
- Run
python toronto_ridership.py - Wait for all steps in the DAG to complete
Step 5 - Load data to BigQuery
- Once data is ready in your data lake, you can load data to bigquery tables
- Run the following code:
bq query --use_legacy_sql=false --project_id=<INSERT_YOUR_PROJECT_ID> --location=<INSERT_YOUR_LOCATION> --format=prettyjson < bq_reporting.sql
- And there you have it, all ridership data is available in BQ external tables ready for querying
Some Further Exploration & Next Steps
- Try deploying in other clouds, e.g. Azure
- Instead of using the managed prefect, self host using VMs or container services (e.g. Azure Container Groups, AKS, etc.)
- Incorporate data from Toronto bicycle data streaming sources for real time views of bike locations
